If you are short of Disk space on your computer and are facing issues in QuickBooks Desktop, then this blog will help you out. The local disc C is often occupied by unwanted temporary files and system junk. Notably, QuickBooks, by default, is also installed on this directory. Besides these files, unwanted or unused programs can also occupy excess disc space.
The space can be freed either manually or by using the Disc Cleaner tool. To delve deeper about how to fix there is not enough space on QuickBooks Desktop, read this article all the way to the end.
What are the error messages due to insufficient Disk Space?
Users can observe the following error messages related to QuickBooks due to shortage of disk space on the system. These are listed below:
“There is not enough space on drive C: to extract this package”
“Free some hard drive space. QuickBooks is running slowly”
“Error: There is not enough free space”

Procedure to clear up disk space for QuickBooks
Abide by the following steps to free up occupied disk space for QuickBooks Desktop.
Step 1: Check the free space and use Disc Cleanup Tool
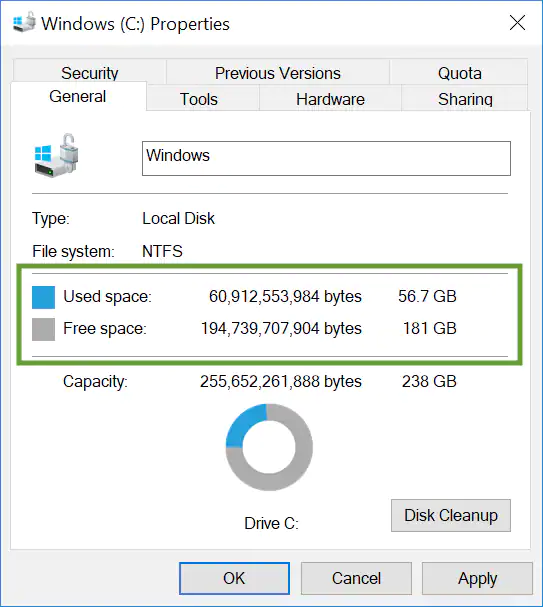
QuickBooks users first need to double-check the free disk space on the directory on which you wish to install QuickBooks. Pertinently, the minimum disk space needed for installing QuickBooks should be 1 GB. However, the recommended space should be 2.5 GB or more. To check the space, follow the steps:
- At the start, the user needs to open My PC, or My Computer, depending on the version of Windows O/S installed on your system.
- Subsequently, right-click the C drive, or the drive on which you want to install QuickBooks Desktop.
- Click on Properties, and then head to the General tab.
- Herein, check the available free space. If the space is less than 2.5 GB, the user needs to implement strategies for freeing up the free space.
- You can use the Disk Cleanup tool from the start menu. Just open the tool and opt for the C drive.
- Now, choose the temporary files tab and proceed with the cleanup process.
- Once done, again check the free space in the directory. If the free space exceeds 2.5 GB, you are good to go with the installation of QuickBooks.
Step 2: Remove the temporary files
- Begin by hitting on the Start menu, and from there, search for %temp%.

- Now, choose all the temporary files by simultaneously pressing Ctrl + A.
- Follow up by pressing Shift + Delete keys.
- This action will wipe out all the temporary files from the system.
Step 3: Deleted unused and unwanted documents
You should delete documents that have been downloaded or transferred a long way back on the system and are occupying space in the computer.
Summing Up!
This article apprised of the different steps to clear up disk space for QuickBooks Desktop. If you are facing any issue, just give our QuickBooks desktop support experts a call at the toll free number i.e., 1-800-761-1787.